Supplies Needed:
One pair of pants - the wider the pant legs the better.
1 package of extra wide double found bias tape
Thread
Scissors
7 - 3/8" dowels
- Start with a pair of pants. Cut both legs off - from the hem up needs to be at least 25 inches. Unpick any seams and cut off the hem.
- Cut the pant legs into even triangles.
- Sew the triangles together per this diagram:
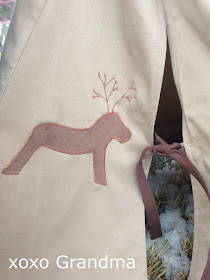
- If you want a design on your teepee, cut the design from a contrasting fabric. HERE is the deer design, if you want to copy the design I used. I drew the antlers onto the deer with a washable fabric marker and then sewed the antler design with a tight, narrow zig zag stitch. You'll need to cut out two deer from this pattern. Place the deer onto the lower portion of each flap. One will be reversed so that your deer are facing each other and the opening of the teepee.
- Next stitch the "do not sew" edge or flap opening by folding over the unfinished edge and stitching close to that edge (see top right photo).
- Sew brown seam tape around the bottom of the circle, starting and stopping at the flap opening.
- For the ties, take the remainder of the seam tape and cut in half.
- Sew that seam tape together finishing off one end of each piece of seam tape.
- Sew this seam tape at 9" from the bottom of the tee pee.
- Follow as described in this diagram:
- Fold in half 1" of 1/8" wide elastic and sew this to the top and bottom of each seam. This elastic will be used to hold your poles to the teepee.
13. I next added a little white jumbo rick rack onto the bottom of the teepee by sewing at the top and bottom of the trim. The white from this trim added a little punch of contrasting color.
14. Thread the dowels through the elastic.
15. Tie the dowels together right above the opening. I used a piece of leather cut into a 1/4" wide x 12" long stripe and wrapped the leather around the dowels a couple of times. This will hold your dowels together.
16. Spread the "poles" apart and let a child have fun pretending.
xoxo Grandma


No comments:
Post a Comment
Love to hear what you think...xoxo Grandma