Showing posts with label Thanksgiving. Show all posts

Wednesday, January 8, 2014

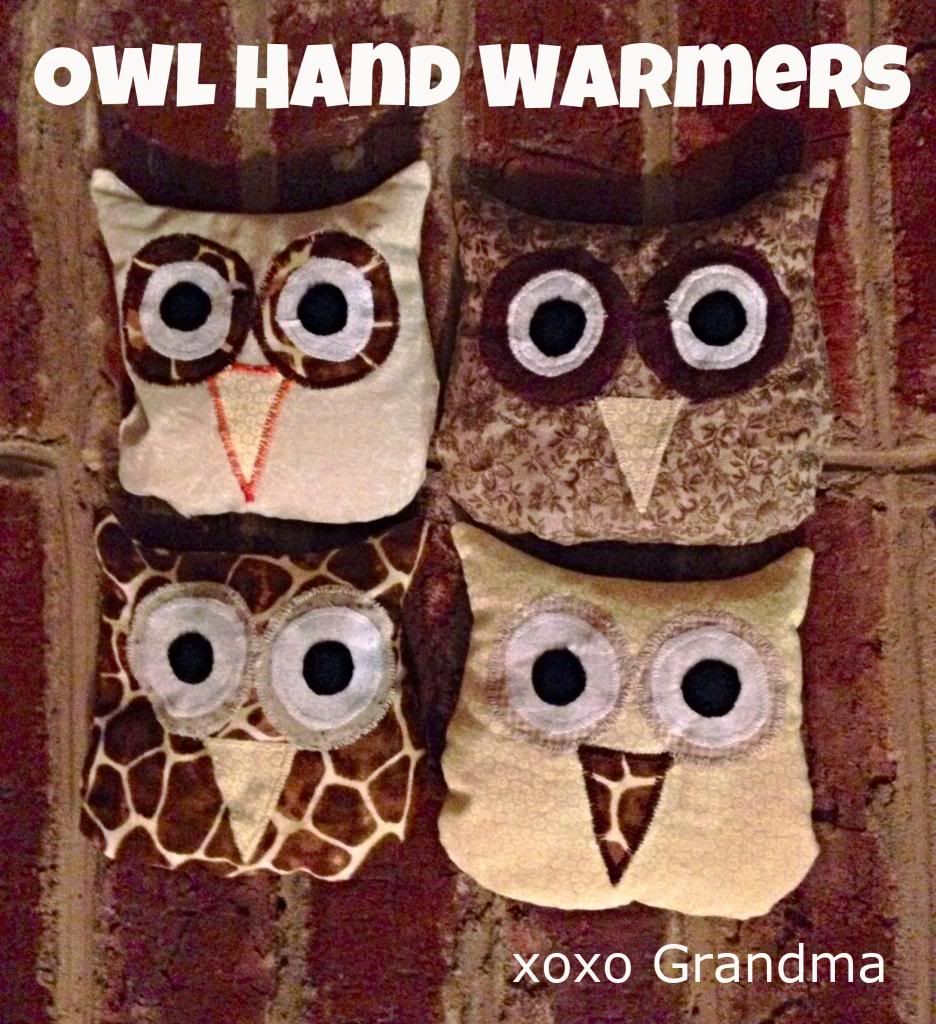
Stay Warm with Owl Hand Warmers

Is it cold your way? Chances are you're probably affected by the winter chill, since much of the United States has been hit with freezing weather.  I have no reason to complain since the weather in my home town has stayed relatively warmer than the rest the nation! We've been hovering around 27 - 32 degrees F.  Which leads me to think of creating things to help me feel and stay warmer.

A few days before Thanksgiving, one of my daughters asked me to make her an owl hand warmer because her daughter loves, loves, LOVES owls. She sleeps with two stuffed owls and has owl pajamas, which she loves so much that when her mother (my daughter) takes them off of her in the mornings, she cries!  Which is understandable because she isn't quite two yet, and let's face it, footie pajamas are just so cozy.

My daughter sent me the link to a project on the Thirty Days blog called Sweet Stocking Stuffer – Handmade Owl Heat Pack.   There was a free pattern on this site, which means an easy project for me to tackle. Of course I added a few tweaks here and there, because that's just what I do.  I added about 1/4" extra width onto the basic owl shape pattern piece because I wanted to be able to have a finished, enclosed seam instead of leaving the edges raw.  I also machine embroidered around the eyes and the beak. I used a bunch of leftover fabric pieces and created seven of these owls before my trip. To transport the hand warmers, I left the owls unstuffed since they would be lighter and smaller to pack.  At her home, I filled the owls with rice, hand closed the openings and gave an owl hand warmer to each family member that joined us for this holiday.  FYI - these owls don't need a lot of rice to fill them - I purchased two huge bags and if my daughter made 20 more of these hand warmers, she'd probably still have rice left over.  I'm guessing they need about 3/4 of a cup per owl.  The weather was relatively warm at her house. I remember the Wednesday after Thanksgiving, it got up to 70 degrees... but oh how the weather has changed since that day!

This morning, I was thinking that I needed to make a few more of these to keep me warmer!  I will add my stamp of approval to this Thirty Days project.

xoxo Grandma
As seen on these linky parties: The Life of Jennifer Dawn, Diane Rambles, 2 Crochet Hooks

Thursday, November 7, 2013

Turkey Name Card Holders - Recycle Cork Project


I am so excited to celebrate Thanksgiving this year, because my husband and I get to spend it with two of our daughters, two son-in-laws, and three of our grandchildren, which is huge (since I've mentioned numerous times how far away everyone lives)!  

I decided to spice up our table settings a bit, so this is what I'm bringing for our celebration: turkey name card holders. I know, they don't sound yummy, but aren't they adorable? They're a fun simple craft to make. Allow about 15 minutes of your precious time to make each little turkey. If you can glue and poke things with a pin, you can do this project. Ready to get started? Here's what you'll need to make your own little turkey card holders:


  1.  Cut one triangle out of orange felt and one teardrop shape from red felt for each name card holder.
  2. Cut one piece of gold wire 4 1/2" long per name care holder.
  3. With the jewelry pliers, snip the end of the straight pins to 1/4".
  4. Dip the pin into the glue and push into the cork.  The eyes should be about 1/4-3/8" apart.
  5. Below the eyes, glue the beak in place.
  6. At an angle, glue the red teardrop shape about 1/8" below the beak. (See the photo above as a guide.)
  7. Wrap the wire around a marker then coil the end of the wire around a medium sized pen tip. (See the photo below).

8.  With a tack, pock a hole in the top of your cork, right about in the center.  Add a little glue to the bottom of the wire and put the wire into the hole you've just made.

9.  Add feathers to the back of the cord, gluing them in a fan shape.  I used 5 feathers each for my turkeys.  It's okay to cut the feather to the length needed.  

10.  After you've printed your name cards, ink around the edges.  I mounted my name cards onto decorative, vintage looking cardstock.


And there you have it! Wasn't that simple? Your Thanksgiving party will love them!

Happy crafting!  xoxo Grandma