Showing posts with label Infant Clothing. Show all posts

Monday, November 9, 2015

Baby Blessing Dress Using Mommy's Wedding Dress


My daughter's wedding dress was a classic: lace with short capped sleeves.  Since she was getting married in October, she wanted the dress to look more like fall. So, we paid to have the dress altered and had the cap sleeves removed from the dress and replaced them with lace, elbow-length sleeves (as seen in the below photo). I asked that the original sleeves be saved and given to us, just in case I might ever need to use them. Those original cap sleeves were my inspiration for this baby blessing/christening dress.


To make this blessing dress, I took those original lace sleeves and cut them down to make the sleeves for this baby blessing/christening dress.  In an ideal world, I would have had more of the lace to use, but I can't say I didn't try. I even went to the dress shop where I purchased the wedding dress to see if I could purchase some. Sadly, the store informed me that it could take up to three months to get orders from this company and suggested that I cut into the train of my daughter's wedding dress, which I did not dare do.  So instead, I cut the leftover lace into pieces as shown below and then pinned those pieces onto the bodice in a random pattern. I tried an organized pattern but it looked awful! Then, I sewed all those little pieces in place - a very time consuming labor of love.


The pattern I used was the same one I used to make my daughter's blessing dress over 30 years ago (photos of that original dress can be seen here). 

I altered Vogue pattern #2878 slightly by adding pleats to the skirt instead of ruffles and shortened the dress by about 18 inches.  My daughter felt the original dress was ridiculously long. 


After finishing this dress, it needed a slip to add some volume to the skirt. But I wasn't in the mood to make the slip that came with the pattern because it was almost like making another dress.  Instead, I made a skirt and then sewed it to the bodice of the dress.  Of course I didn't think of this step until the dress was completely finished, so I ended up hand sewing it into place.  


Just look at those old looking hands, those are my hands holding this precious baby on her blessing day. Didn't the dress turn out so lovely?


So grateful that my husband and I had a lot of SkyMiles so we could be there when our newest granddaugter was blessed by her dad at church - it was such a special day!  xoxo Grandma

Linked to:  Project Run and Play You might also like theses blessing/christening dresses:
Here
Heirloom Dress

Tuesday, May 26, 2015

A Sunhat From Placemats - a Refashion


Summer is right around the corner and to protect that precious skin, try sewing up THIS free Petal Sunhat pattern designed by The Cottage Mama.  

I'm glad to report that this was an easy sewing project.  To add a lot of detail to the hat, I used two fabric embroidered placemats instead of regular yardage to cut the pattern from. Look at all that darling detail work on this placemat that I snatched for 50 cents each from a second hand store!


From each placemat, carefully center the pattern pieces over the center of the embroidery designs and cut out the pieces. 

You should be able to get three pattern pieces from each placemat. (The piece in the middle was plain white with no embroidered details.) 

I next unpicked some of the details that were too close to the edges as follows:


Then I followed the directions as stated with the pattern except for the part about where to leave the opening in the fabric to turn the hat.  I did not want to hand stitch along the scalloped edge of the hat.  Instead I left my opening to turn it on the side seams of the hat as shown below.


I also omitted the button from onto the top of the crown because I wanted my hat to be completely reversible. 


I liked this pattern so much I made two of these sunhats. 


If you need a cute sunhat, try this pattern and use a fabric placemat to make it look like you spent hours embroidering it when in fact you only spent half the time. xoxo Grandma

Thursday, January 22, 2015

Baby Bubble Dress - a Refashion


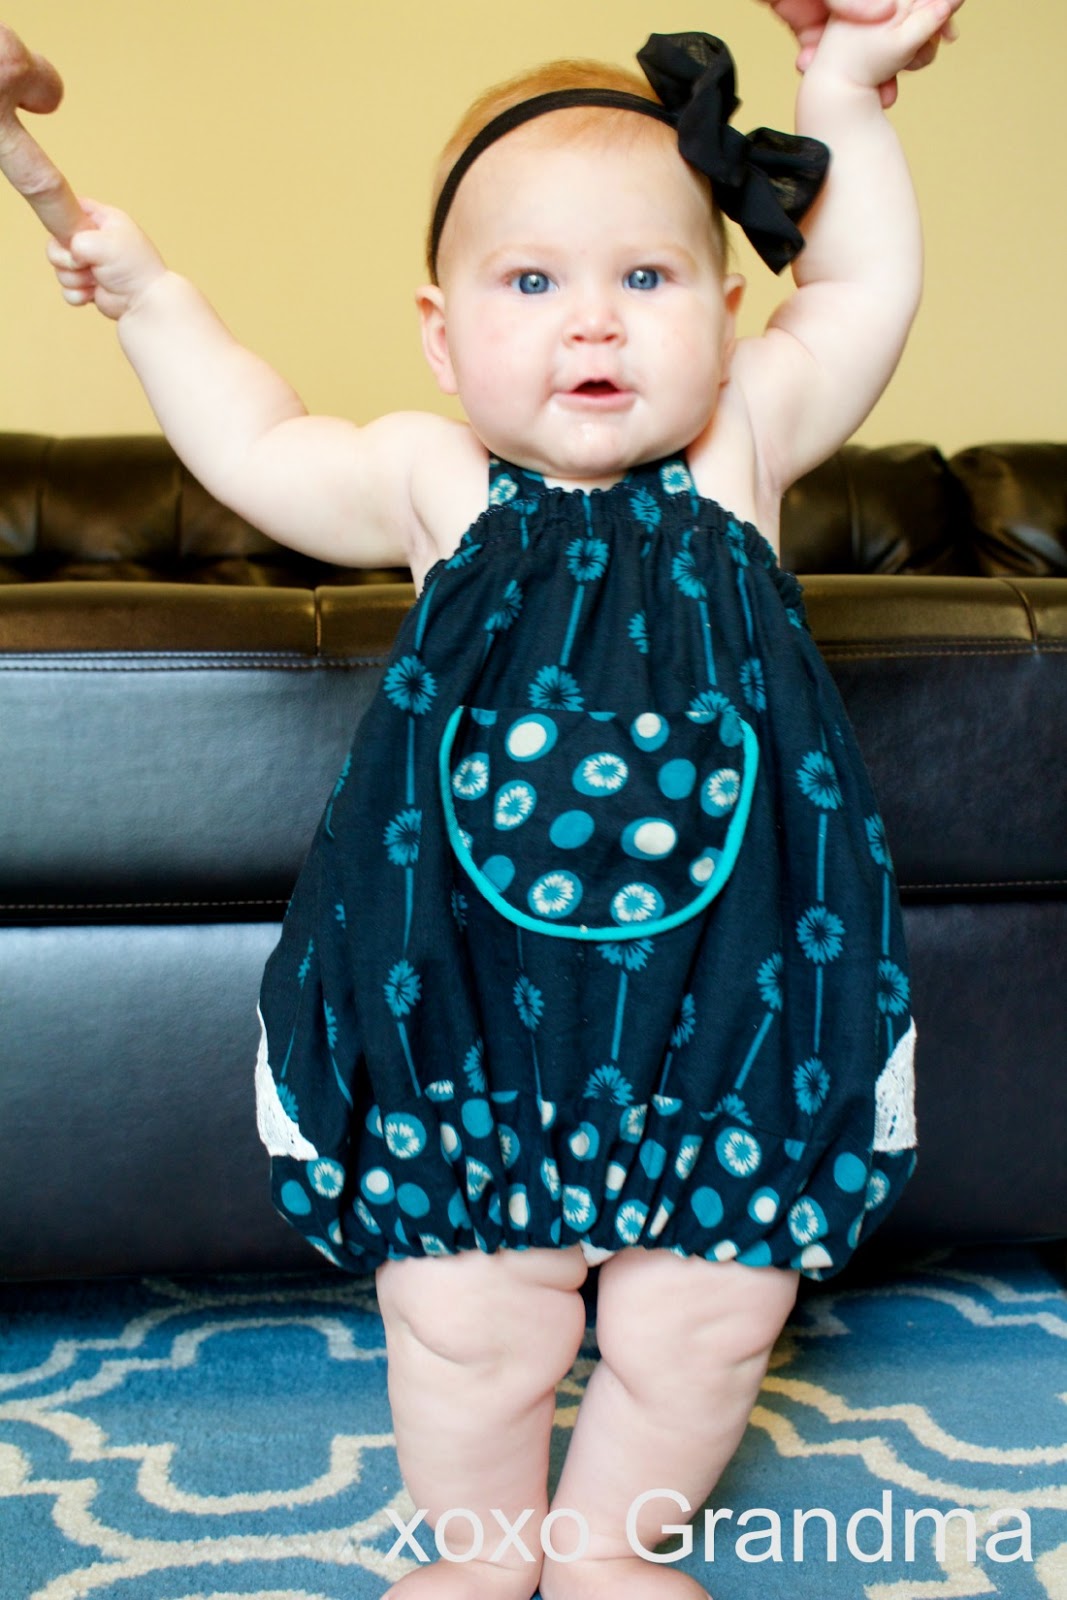
While visiting my daughter's family, I got the chance to sew a baby bubble dress for my almost eight month old granddaughter and to play along with Project Run and Play's January 2015 sewing challenge and Free for All at Frances Suzanne. 


I started this project with one of my daughter's old shirts. I really loved the black, ivory and turquoise fabrics, the colors compliment this sweet babies pretty blue eyes, and her delicious chub, perfectly.  


Here's how my creation turned out using Alida Makes tutorial changed up a bit to fit this little chubster (which is what her big brother calls her).  I took a square of lace and cut it into a triangle and added these pieces to the lower sides of the dress.  A trimming look to that thigh area!


I also inserted the elastic at the top of the dress eliminating the extra ruffle.  I didn't have elastic thread to use for the bottom shirring as directed in the tutorial and had no idea how to even find any in the foreign country my daughter lives in so I used 1/2" elastic and made a casing instead and luckily, it worked.  I also added a half circle pocket to the front of the dress to hide a hole in the fabric which is why the top was no longer worn.  My granddaughter hinted that she would like a pocket to keep a toy in...ha ha!


Don't you just love her rolls, blue eyes and red hair?  Yup, she's a cutie and her grandmother kisses her dozens of times a day just knowing it'll be a long time until I get to see her again.  (Sadly, my daughter swears she won't fly half way around the world to come home with her children until it's time for her husband's job to be over.  I understand, honestly I do....I even had a hard time with the long, long flight over here.)


I sure enjoyed refashioning this top into my version of this bubble dress baby style.  I mostly enjoy my time with this little girl's family.   Do you like bubble dresses on babies?  xoxo Grandma

Linked to: Threading My Way, Creating my Way to Success, Frances Suzanne

Monday, November 10, 2014

Warm Lined Baby Booties - a Tutorial and Free Pattern


Brrr, it's getting cold outside.  Has your weather turned cold already too?  If so, I've just created a pattern to keep your babies feet toasty warm.  You can download the free pattern for baby booties HERE (make sure you do not print it "to fit," just print as is).  These booties aren't your typical baby booties either because these ones actually stay on a baby's feet. They are sized to a toddler 4 (which should fit a one year - 18 mo. baby).  But feel free to adjust as necessary to fit your own little one. 

Supplies needed:  
  • 1/4 yard of fur (faux fur works too)
  • 1/4 yard of faux leather
  • 1/4" elastic
  • 1 sheet of sticky foam (for the soles)      
  • socks with non-skid soles (hospital socks work great for this) - optional             

Note:  use 1/4" seams  unless otherwise stated.  Cut out all pattern pieces: two from lining and two from outside fabric.  For the outside fabric, I used faux leather on the pair photographed.  You'll need a left and right piece per pair of booties.   
  1. Cut out the pattern pieces.  For the sole, I used a pair of those ugly socks that some hospitals give you when you're having a baby.
  2. Sew the toe lining to the toe piece along the top seam.  
  3. Clip curves.
  4. Turn the toe piece so that the outside fabric is on the outside.
  5. Baste the back pieces together.  Now sew the casing per the details on the  pattern piece.
  6. Photo showing the bottom of the casing being sewn.
  7. Sew on the bias around the back top edge.  Do not sew the bias onto the casing.
  8. Turn the bias and sew to the reverse side of the back edge.
  9. Top stitch around the bias as close to the stitched edge as possible.
  10. Top stitch toe pieces along the edge.
  11. Sew a strip of bias together.  Turn right side out.  This will be your back tabs.
  12. Sew the sole to the back piece and then attach the toe... in that order.
  13. Sew a scrap of fabric to the middle of the toe piece as directed on pattern piece.
  14. Photo showing placement of this tab.
  15. Thread 6 3/4" long x 1/4" wide elastic into casing in the back pieces and through the tab just sewn.
  16. Stitch elastic together.
  17. Sew on the tab onto the middle of the upper back pieces. 
  18. This photo shows the foam pieces with the fabric attached to one piece on the right side and one on the left side.
  19. Glue the sole with the fur to the foam sole lining.  You'll want to use a washable glue if you want to keep these booties clean.
Once you're done sewing, you should now have warm, fur lined baby booties that will look like this when they are finished:


Warm feet for my granddaughter!  This little one is learning the joy of creating.  Time to play with chalk anyone?


Don't these booties look toasty?      xoxo Grandma

Etsy shop: xoxo Grandma

Totally Tutorials Blog

Monday, September 29, 2014

Falling for Denim


Take one vintage pattern: 


Change it up. A lot.  And you get the cutest Fall jean jacket! Here's my granddaughter modeling my latest creation (and her newest piece of her Autumn wardrobe):


I started this project with coral denim fabric that a friend gave me and added denim colored Rit Dye to get this lovely, rich plum color.  I wanted a peacoat style jacket but being frugal, I resorted to using this pattern by deleting the mandarin collar, making the bodice one piece, adding a pleat in the back and taking the gather out of those sleeves.  It would have saved me hours of labor if I would have just purchased a pattern!  I know, I'm a little crazy... but this jacket turned out great and that's what counts, right?


I lined the jacket in adorable owl fabric that I found at Hobby Lobby.  

 I think she really likes those owls!


She even tried her new easy-sew fall dress under her jacket.  It's always nice when a jacket looks great with more than one outfit.  For more photos of that dress and a tutorial on how easy it is to sew together, go HERE.


If you look closely, you'll see the cute woven design on the jacket's buttons. I love them! They are from La Mode and are called "Hook."  I love that these buttons resemble wicker and are washable. So many buttons I looked at for this jacket were dry clean or hand wash only.  Really, who would send a child's clothes to the dry cleaners? I can bet none of the mothers of young children have time to hand wash their children's clothes. So these buttons were a perfect find! 

Now to reveal what she was wearing underneath that cute denim jacket: 


The next part of this Fall outfit is the stretch denim leggings which were refashioned from a pair of my daughters old "jeggings."  She purchased them online and when they arrived they were too small and she just never got around to returning them.  So, she handed them over to me to refashion. 


If you'll note the above photo... this little nine month old model of mine is teething big time. The drool coming out of her cute little mouth is never ending! It made me laugh seeing it captured in the picture and ready to plop on her new outfit. Oh what a mess, but so cute in her new outfit, right?

Lastly, I sewed up a mustard, long sleeve top, which has denim piping and a little mustard colored lace inserted into the bodice.  This top was refashioned from one of my camisoles that was too big for me when I purchased it. I thought it would shrink, but it never did.  So why not use it to make this darling girl a complete Fall outfit?


So there you have it, week 3 of Project Run and Play's denim challenge.  I'm falling for denim this time of year, aren't you?    xoxo Grandma

Linked to:  Threading My Way, Nap time Creations, Project Run and Play, Lou Lou Girls, Crafty Allie, The Dedicated House

Tuesday, July 29, 2014

Gap Knock-off Tie Dress & Ruffle Bloomers - Free Pattern

Isn't this little girl precious? Whenever my daughters request I make something for their little girls, I can't say no. Could you say no to that cute face?

Well, as you know, I love to refashion and I'm so happy to share my pattern to make this Gap knock-off tie-tank and ruffled bloomers with you today! 


My daughters loved the Baby Gap outfit (pictured above) which retailed for around $42 for the two pieces. While I was visiting my youngest daughter and helping her with her newborn baby, she gave me this soft blue Chambray cotton button-up shirt to refashion.  Although the fabric wasn't the dark denim, I thought the style of this outfit would look great in this fabric.
After I came home from the visit, I used this old shirt to make her baby the outfit she requested.  I changed my creation just a bit because that's the fun of creating your own knock-off outfit.

The free pattern I created is sized for a one or two month old baby. FYI: my granddaughter (that little chunk of a baby above) was born at a whopping 9 pounds 4 oz., so this pattern could fit a baby up to three months old - that is, if the baby was born a bit smaller than my granddaughter.  HERE is the free link to that pattern. Feel free to download it and make your own outfit for a fraction of the cost.  If you have a long sleeve shirt like the one pictured, the only cost to make this outfit will be for the thread and elastic.  So, what are you waiting for?! Let's get started.

Supplies needed: thread, elastic, scissors, pins, a tape measure, and one women's button-up shirt.

From the bottom of the shirt's hem, measure 10 1/2" and cut. (This piece becomes the skirt of the dress.)  Apologies, this photo is a little out of focus - oops!
Next, using the pattern, cut out two each the bodice front and back from the upper part of the shirt or the sleeves - one of each will be used as the facing.  Cut out two rectangles, on the bias: 1 1/2" x 8" for the shoulder ties.  

For the diaper cover, I used this free pattern from MADE because it's simple and really a perfect pattern.  You'll just need to cut out a few ruffles.  For my top ruffle I unpicked the collar and sewed the lengths together.  Next, cut out two rectangles that were 2" x 14".  These rectangles were used for extra ruffles on the bum. Follow Made's instructions on making the diaper cover, but before you assemble the pieces, sew on the lower bum ruffles.  Attach the top ruffle right along the top of the diaper cover. The second ruffle needs to be ruffled and sewn at 2 3/8" below the top edge.  The third ruffle needs to be ruffled and then sewn at 4 1/8" below the top edge.  To see how this looks, see the last photo at THIS post.  

NOTE:  All seams are 1/4".

Sew the two bodice pieces together by sewing each of the shoulder seams & iron.  Lay the right sides of the bodice together, matching up the shoulder seams.  Now sew around the neck and the armholes.  Here's the tricky part - turn the sewn bodice inside out and iron. Add a gathering stitch to the skirt and pin onto the bodice only (do not pin to the lining).  The button part of the shirt will be the back of the dress.  Sew the bodice to the skirt & iron.  I like to hand sew the bodice lining to the seam, turning under 1/4" of the unfinished edge.  Top stitch according to the photo below.  

Ties:  Attach small safety pins (to make it easier to turn your fabric) to the top of the two tie fabric, sew together the length of the ties. Turn right side out & iron.  Now tack those ties in place, as shown in the photo below.
Buttonholes:  Because the second to the bottom buttonhole on the original shirt I used was sewn with bright pink thread, I ran with that idea and used a different color of thread for each of the bodice buttonholes.  I also had to add one more buttonhole at the bottom of the dress. Don't forget to recycle the buttons from the top of the original shirt and use these on the bodice.
Diaper cover:


Optional:  If you'd like, unpick the pocket from the original shirt and sew it onto the dress....not that this baby is going to stick her little hands into the pocket but it adds a nice detail.  What do you think? Turned out pretty cute, I'd say. - xoxo Grandma