Showing posts with label Service. Show all posts

Tuesday, August 23, 2016

Serving Through Sewing


"No time is better spent than that spent in the service of your fellow man."  That quote rings true to me and today, I'd love to get you thinking of ways you can use your sewing talent to bless others.  Below is a list of six organizations that need sewers who are willing to give of their time and create specific projects.  If you're up for a little challenge, choose at least one of these groups and make something for someone you don't know.  When you're done, I promise you'll feel good inside. Service just does that to you! 

Skirting The Issue- Sponsored by Simple Simon. From July through August, sew any size of a skirt for girls in your local foster care system.  These skirts are a blessing to girls throughout this system so they can have something new for back to school. Below are a few tutorials that can help you create a cute skirt:

Free skirt tutorials:

Easy Back to School Skirt, a Refashion & Tutorial


Flock of Birds Skirt


This year Simple Simon has also added quilts to their list of handmade items to donate to the foster care system in your area.

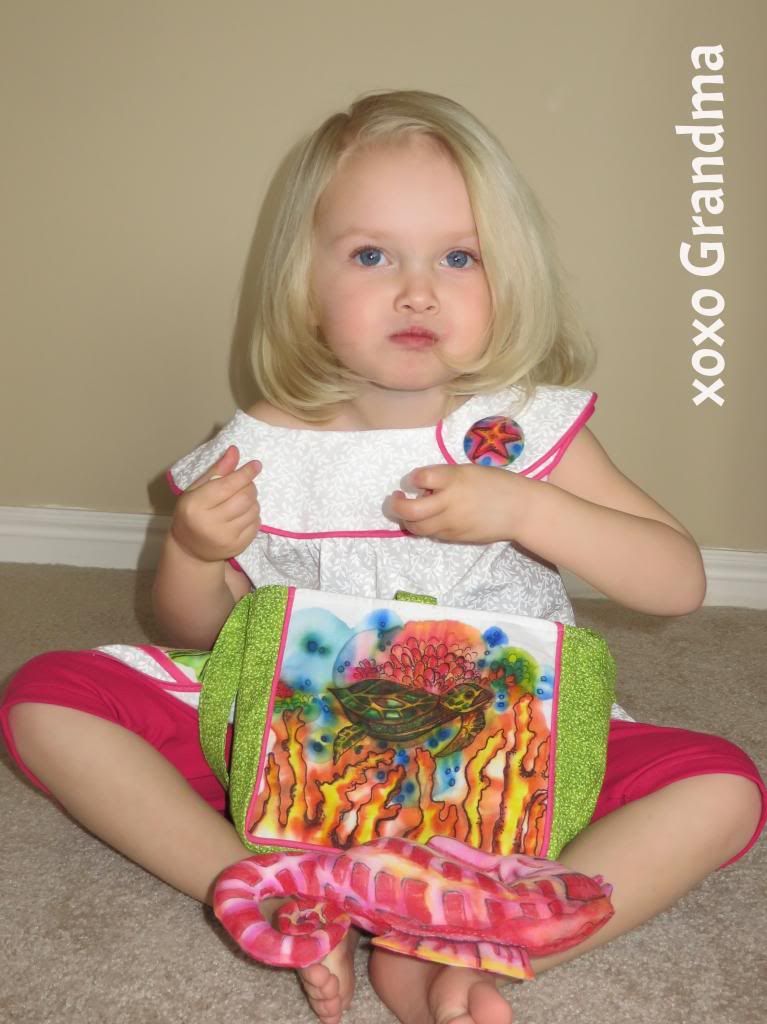
Sew Powerful- Sponsored by Liberty Jane, asks others to sew cross body purses for girls and women living in Zambia. Below is a link to teach you how to use your scraps to make this project.


Using Scraps to Make a Cross Body Purse for a Good Cause


Primary Children's Hospital- Sew monsters, safe sleep sacks, or medical play dolls as shown in the photo below.  You can even make no sew soft blankets.


Feel free to go to this post and download a free pattern and tutorial on how to use fleece scraps to make a few monsters:


1 Million Pillow Cases- "American Patchwork & Quilting is challenging quilters, sewers and crafters to help us reach our goal of donating one million pillowcases to local charities.  Many charities can benefit from the donation of a pillowcase and the challenge gives you the opportunity to donate and make a difference in your community."

The Linus Project- "Provide love, a sense of security, warmth and comfort to children who are seriously ill, traumatized, or otherwise in need through the gifts of new, handmade blankets and afghans, lovingly created by volunteer "blanketeers."

Humanitarian Quilts- Make a quilt that will be given to those in need.

If you know of any other organizations that you think should be added to this list, please leave me a comment or send me an e-mail and I'd be happy to add them.  xoxo Grandma

Monday, August 3, 2015

Using Scraps to Make a Cross Body Purse for a Good Cause


I love it when I can create something fun from fabric scraps. This cross body purse was the perfect project for scraps. So, gather your scraps and let's have some fun! 


To create this purse, I took the leftover scraps from making this dress and sewed them together into larger pieces.  Using my larger pieces of fabric, I was able to cut out the Cross Body Purse pattern. You can do the same thing with all your scraps. First let me tell you about the cross body purse I made.

A charitable organization called Sew Powerful distributes these purses to young girls in poverty stricken countries.  If you haven't heard about this group, you're not alone. I first heard about this organization a few weeks ago. I received an e-mail from one of the companies that helps sponsor this project offering a free pattern to all those willing to make this bag for their charity group, Sew Powerful. The sponsor provided a link to Sew Powerful's site where I read about their program and why these purses are important to young girls.  
Here's some of the basic information about this service project:

"CAN A PURSE REALLY TRANSFORM A GIRL’S LIFE?

The purses you provide are used in local schools and clinics in Lusaka Zambia as part of Menstration Hygiene Management (MHM) programs. This simple gift – combined with re-usable sanitary pads and health information can make a tremendous difference in the lives of adolescent girls. Read about the amazing results of our 2014 Sew Powerful Purse Project here. Our ministry partners work hard to educate and inform the girls in their community so that they stay in school and grow in confidence and self-esteem. It really is sew powerful!"


If you would like to help a good cause and you enjoy sewing, this project is for you. To make this purse, you'll need to download the free pattern by registering here.  


So, to get started, gather together all your scraps and sort them out according to ones that work together. 
Once you've got your scraps all organized, sew them together like the two scraps above using 1/4" seam allowance to make large pieces. Once your pieces are sewn, iron all the seams open. Then lay the pattern pieces onto your now larger pieces of fabric and cut out your purse. 
Note: reinforce any seams that were cut before you sew up your purse. 

Then sew together this scrappy purse.  From start to finish this project took me about 3 1/2 hours to make. The pattern is marked as an intermediate level.

It makes me happy to use my skills to serve others.  I hope you will join me in making purses for this service project. The concept behind it is such a blessing to others.

I really like the look of all these fabrics patched together.  The finished result adds a lot of interest to this purse.  Aren't these the prettiest fabrics?  They are from a collection called "Up Parasol," which I found on Pattern Jam's site.  Happy purse making! xoxo Grandma

Linked to: Threading My Way; Charity Sewing, Nap Time Creations

More Purse Links:
Bike Sling Bag

Spring Bag
Seahorse Bag


Thursday, July 30, 2015

A Flock of Birds Skirt


After I designed the bird applique pattern in yesterday's post, I starting thinking how cute it would be to have a whole flock of birds sewn along the bottom of a skirt, creating a border. To accomplish this task, I spent a lot of time cutting, measuring and machine embroidering but the finished outcome is so worthy of sharing.

At first I cut out all the birds and wings from two different fabrics but after laying everything down onto the skirt, it looked boring. So, I cut out more birds bodies and wings from different fabrics, mixing the fabrics up as I positioned the birds in place. 

If you want to create this skirt, get the bird pattern here and have fun cutting. Reserve about 3 1/2 hours to add this design to a skirt.  The bird's eyes was cut from the black and white polka dot fabric and then machine embroidered in place. My bird's beaks are about 1 inch apart and their tail feathers are around 2 3/4 inches apart. These dimensions will vary for you depending on how wide your skirt is.  A tutorial on sewing these birds onto a skirt is found here.

I love the look of this flock of birds skirt!  Don't you think a little girl would have fun wearing a skirt like this?  xoxo Grandma

Linked at: Simple Simon and Company, Threading My Way, Nap Time Creations, USS Crafty

Wednesday, July 29, 2015

Skirts for Skirting the Issue & a Free Bird Pattern


It's that time of year when seamstresses across this nation turn to making skirts.  Simple Simon and Company sponsors a project called Skirting the Issue. All the skirts donated to this project are given to girls in foster care.

My niece and her 9 year old daughter came to visit me for a few days.  I explained to this cute 9 year old a little about this project. She was impressed and wanted to be my model for it. 


This magenta colored skirt (pictured above) was pretty simple, so I decided to step it up a notch and add a little fun. 


See that cute little bird? I had a little too much fun creating the pattern for it. The pattern is a good one for using your scraps. It'll add a whole bunch of pizzazz to a simple skirt. 

If you'd like to use this simple design too, download it here.  Then cut out the three pattern pieces.  Layer them together onto one side of a skirt using either a glue stick or fabric spray adhesive to keep the pieces in place.  I added some tear away stabilizer behind the design.  Next, machine embroider the pieces onto the skirt using a zig zag stitch.


To mark the legs onto your skirt, use bright yellow thread and hand stitch two three inch long lines.  Then hand stitch the lower bird feet lines. Once those are in place, machine stitch right over these basting stitches.
  

The finished bird should look something like this when completed:
I had a lot of fun machine appliqueing this design onto several of these skirts.  I love that Simple Simon and Company sponsors this project every year.  If you have time, why not sew a skirt to donate to your local foster care program?  It'll really leave you with a good feeling if you choose to participate in any charity project. You have until August 15th to get your skirts sewn and donated to this cause.  xoxo Grandma

You might like these posts:


Monday, April 6, 2015

30 Minute Stuffed Animal - a Refashion


Who wants to make the easiest stuffed animal ever?  I love quick projects and this refashion to make a stuffed animal is so easy, you may want to make more than one. Plus, keep reading to find out how you can use them to help a good cause! 

Start this project with a tee shirt that has an animal on it.  

Using a washable pen, mark 3/8" around the animal. This will be your seam allowance.


Along the marked seam allowance, pin around the inside of your markings and cut out the animal.


Now re-pin your animal together with the right side of the image on the inside. 


Sew a 3/8" seam all the way around the animal, leaving at least a 1 1/2" opening along the bottom or the side of the animal.  Clip curves and turn right side out. 


Stuff your animal with fiber fill.  Hand sew the opening closed. That's it!

30 minutes later, you'll have a darling stuffed animal. I told you this refashion was so easy!  

Please think about making a few of these or other softies and sending them to Sew Mama Sew by April 30, 2015. 

  • Ship to:  Sew Mama Sew, 13850 SW Bonnie Brae St., Beaverton, OR 97005, USA
The toys donated to this drive will be given to children in foster care.  I just love when we can use our sewing skills to help children in need, don't you?  
xoxo Grandma

Linked to:  Creating My Way to Success, Nap-Time Creations, Crafty Allie, Totally Tutorials

Tuesday, November 18, 2014

Making Snowmen from Scraps


If you're like me, you probably have tons of scrap fabrics left over from past projects that you just can't seem to throw away.  I usually make doll clothes out of them, but when I saw this pattern I thought this would a fun and different way to use up those scraps. 


This project actually started back in June. I cut out six snowmen and some clothes for them. And then it got hot and I didn't feel like sewing them, nor did I want to think about winter and snow because that would mean I'd be shoveling and freezing!  I'm really not a fan of winter, are you?

Then a few weeks ago, when the weather turned a little colder, I finally felt ready to sew these together. But, of course, I couldn't find the pattern or the instructions.  After searching and cleaning a bit, I decided that I must have thrown them away. "Oh well," I thought, "it really doesn't matter because I usually change things when I'm sewing anyway." So, below is the outcome of pattern-less snowmen. 


For these snowmen's bodies, I used left over batting and the tiniest of noses from my Easter carrots free pattern found HERE.  For this snowman's hat, I used fur which was left over from making baby booties.  


This snowmen's coat and hat were from a fleece scarf one of my children made in a sewing class.  

This snowmen is wearing a nice warm refashioned wool sweater that a daughter left at home.  I had to work around a few pin holes that the sweater had but don't you think that this little snowman looks toasty warm in his winter looking attire?   


The scarf above was refashioned from a belt that I took off a jacket.  

In several of the snowmen's hands, I found some small ornaments that I attached with a few quick stitches.  I think these scraps of fabric made some pretty adorable snowmen.  Yes, snowmen from your scraps take on lots of personalities and are a fun way to use up your leftovers. 

Now that these snowmen are completed, if my children don't claim all of them, I'll be donating a few to my favorite winter charity, Festival of Trees. Happy scrapping! 
-xoxo Grandma

Wednesday, July 23, 2014

"Skirting the Issue" Sewing Night!

Last Thursday night, I went to the "Skirting the Issue" event sponsored by Simple Simon/Project Run and Play. During this event, the blogosphere-sewing world was invited to participate by making skirts which would be donated to girls in local foster care programs so they'll have a new skirt to where when they go back to school in the fall.  By the time I left this activity, I had five skirts completed to donate to this cause.  On Saturday, I finished three more skirts.  The grey skirt pictured above was one of those skirts.  It was made from a hoodie and white knit fabric recycled from a camisole.  It is one of my favorite skirts out of the ten I created for this cause.  It's casual, could be worn with any shirt and it was easy to sew together with items donated to me by a friend - thanks Lindy!  Monday night I finished the skirt pictured below which was refashioned from a men's shirt and a little leftover grey knit binding.

This black skirt  with white ruffles was finished on Tuesday night. It is sized for a 4 - 6 year old and was refashioned from a women's tee and accented with ruffles cut from a camisole.  I added white side pockets to - I just love pockets in my skirts!  HERE is a tutorial on how to make this super easy skirt.
 A big thank you to these two women, Liz and Elizabeth (the wonder women from Simple Simon and Company/Project Run and Play and Project Sewn ) for putting together such a great service project and allowing all of us to join in the fun. You can read more about this cause HERE.  Please join us, you'll be glad you did!

As far as I know, this 11 year old was the only male who attended this activity (except a photographer whose three photos I borrowed for part of this post).  In the photo above, I am helping Gaven use a serger.  He sewed really fast and when I tried to explain that he needed to slow down, well, he likened the serger to a race car and said it was so much more fun to go fast! Dang, he was a cute kid!  I'm so impressed with his mother for teaching him that service can be fun and allowing him to participate.

Here are the first five skirts I made:
One of the piles of skirts completed toward the end of the activity:
Skirts for teenagers:
Take it from me, serving is fun (and skirt making is too)!  xoxo Grandma

Other skirting the issue posts:

Tuesday, July 15, 2014

Refashioned Pillowcases

I refashioned two identical pillowcases, one as a dress and the other as a skirt.  The skirt was super simple.  Now, where are my granddaughters now that the skirt and sundress are finished?  I think I need to book a trip to see one of them... if only I had more vacation time - sigh!

Have you tried either of these sewing projects?  When I first saw this skirt on Pinterest, I knew I had to try this because I recognized that pillowcase, I had two folded in my linen closet. When I went to the website, I wasn't impressed! There wasn't a tutorial on how to make this, so I had to figure it out on my own. Last week, I found a video tutorial on how to make this kind of skirt.  Simple Simon and Company called this a paperbag skirt.  

I'm excited because this Thursday evening, I'm planning on going to the sew-along to help make skirts for girl's who are in foster care. If you're interested in joining me, you can find all the details HERE - doesn't this sounds like fun?  -  xoxo Grandma