Showing posts with label patterns. Show all posts

Wednesday, April 15, 2015

Spring Sling Bag


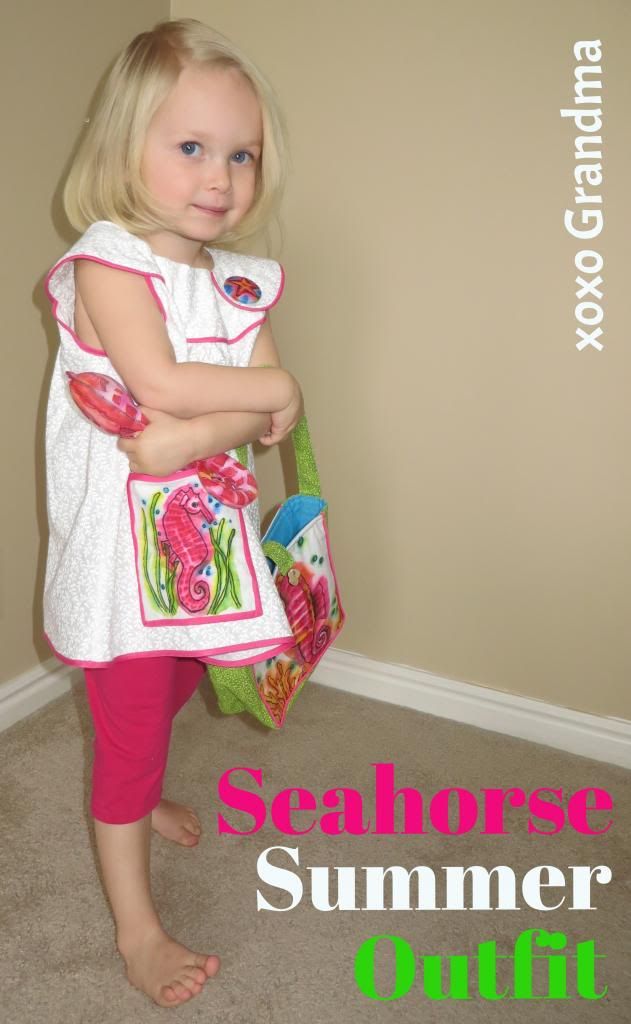
What says spring to you? Is it caterpillars emerging into butterflies, the color of green grass, flowers blooming or maybe it's a new bag with pockets? These are things I thought about as I designed this reversible spring sling bag.


This is the first sling bag I've ever made and only my second attempt at even making a bag.  This basic project was selected by Mandy with Sugar Bee Crafts as April's Project Run and Play project.  The pattern was easy and fun, so hop over to Sugar Bee Crafts and download your free pattern. 


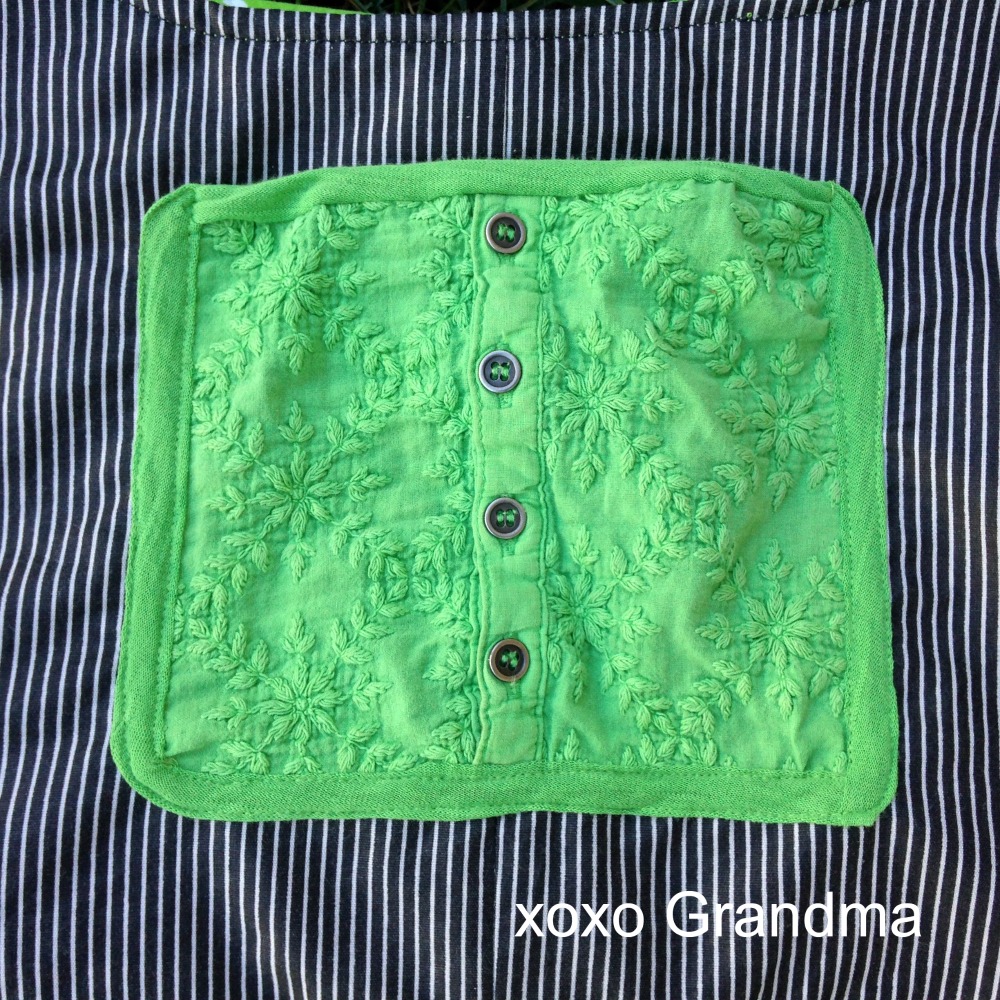
To start off this project, I knew that pockets were an essential item to add to any bag so I added two pockets to my sling bag.  For the first pocket, I had a little fun using the Sharpie fabric art technique found HERE and added an image of a caterpillar morphing into a butterfly. To make the image pop, I also added a few embroidery stitches to this design.  The second pocket was taken from the bodice of a knit tee shirt which was left in my refashion pile. I loved the floral sewn design on the fabric and thought it would make a fun pocket on the black and white stripped side. I simply took a little of the knit fabric and finished off it's edge and sewed it onto the bag.  I also love the details the buttons gave to this pocket.


I love that the bag was designed to be reversible. 

If you decide to make this bag, here's something you may want to consider: turning the bag inside out is TRICKY! As I was turning the bag right side out, it was incredibly difficult to reverse it!  I'd cut the pattern down quite a bit because my granddaughter is a petite four year-old and the bag pattern was designed for a 9 year-old. Plus, I'd added bulk with the addition of the pockets. So, the entire time I was trying to flip it, I was thinking it wasn't going to work. Relief washed over me as I finally, FINALLY got it after much tugging. I agree completely with the directions as they state it's tricky to do this.  

I love this little spring sling bag and have already started another bag, which I'll show to you soon!  xoxo Grandma

This project made it to one of ten selected for voting, please go HERE to vote for it.  Thank you!

You might also like these projects:
Here
HERE

Linked to: Nap-time Creations, Crafty AllieProject Run & Play

,

Monday, November 17, 2014

Winter Wonderland Pillows - Add Texture to Sewing Projects

Before I left on my "new grandchild/Christmas" trip last year, I created a little project to take with me, using scraps of fabric and ribbon. This project was very portable; it was small enough that I could carry it in a medium sized zip-lock bag and stuff it into my purse. You know, for those down times when you don't want to watch anything on television or the baby doesn't need changing or it's someone else's turn to hold the baby or the little apartment doesn't need to be cleaned - again.  

I used a Fiber Mosaics pattern #61202, Winter Wonderland as inspiration:
   

When I opened the pattern, I discovered the pieces were too small for my eyes. So with a copier, I enlarged them quite a bit. Then I changed them just a little, hand-stitched the fabric art and then added some embroidered details.


Here are a few tips to add texture to this and other fabric art projects.
  • Use a variety of fabrics. The hat above is a quilted looking gold fabric stitched over some embroidered hair. I also used cotton, flannel, fake fur and fleece to create the figure's clothing.  
  • Use a variety of embroidery stitches. French knots were used for the pom pom on the bottom of the hat.  The hair was a series of tightly stitched running stitches.  On the ends of the scarfs, I tied a knot and left 6 strands of floss loose so it would look like fringe.
  • Add different scraps of lace to the edge of the clothing.  
  • Use different embroidery thread to add more interest. Most of the details were added with cotton floss but for the skates, I used a shinny thicker silver floss. 

  • Ribbon can also be used for the tree trunks, for windows and even scarfs.


Texture really adds a lot of fun to sewing projects!  With all my children moved out of my house, I've decided it's time to update a few of their bedrooms, and these two pillows make a fun accent in my dusty blue room.  

xoxo Grandma
Linked to 2 Crochet Hooks

Thursday, November 6, 2014

Everyday Tank Tour - SF Baseball Style Shirt

Today I've joined another group of talented seamstress to bring you my version of the Everyday Tank by Sergerpepper:  Top & dresses. If you'd like this free pattern, make sure you keep reading this post because the pattern's designer is sponsoring a giveaway!

Ta da - here's my latest boy's shirt! I refashioned two of my husband's "donation" pile shirts into a one of a kind San Francisco Giants World Series shirt. Last week the Giants won the World Series!  I'm not a huge sports fan, but I watched every game of this series, while I sewed a little of course.  YEA Giants!

The graphics say it's the San Francisco Seals - if you don't know a lot about baseball, then let me explain a few facts. The San Francisco Seals were a professional baseball team that played in the Pacific Coast League from 1903 through 1957. There was even a Seals Stadium which was constructed in San Francisco, California in 1930 for this minor league. The stadium was demolished in 1959.  My husband actually attended his first game with his best friend and his baseball loving mom at this stadium.  Years later, he purchased one of those vintage reproduction shirts, and now he no longer wants it, so I used the graphics from this shirt for the front and the back of my tank/shirt.  


Making this tank had a few challenges.  The hardest part for me was deciding what fabrics to use for my grandson. When I saw these shirts in the give-away pile, I knew just what I was going to do.  Refashion of course!  The next challenge was cutting out the front graphics with the seal on it.  The graphics was high on the shirt and I needed the shoulder parts to fit per the pattern.  That is why I divided the center front piece into two sections. The black at the top gives the whole shirt's front graphics a framed in look.  If you want to try this technique, simply fold the pattern piece into two pieces and add a seam allowance for each pattern piece. The only bad part of using these two colors of fabric together was I choice to change the thread colors often depending on which color fabric I was sewing on made this a time consuming task.  

If I had to do it over again, when making a shirt for a boy, I would raise the front neckline. As the pattern is made, it's too scoop neck for a boy.


I shipped this shirt off to my far away grandson, and was hoping it would fit him!  What do you think?

If I had to do it over again, when making a shirt for a boy, I would raise the front neckline. As the pattern is made, it's too scoop neck for a boy.


One question, did you watch the World Series at your house, if so, who did you cheer for?
You can purchase the Everyday Tank Pattern from:
xoxo Grandma

Wednesday, November 5, 2014

Nautical Dress - Blaverry Ansley Pattern Tour


Today I'm part of a blog pattern tour. That basically means a bunch of different bloggers are trying out the exact same pattern in different ways.  Fun idea, right? The pattern being tested is the Ansley twirl dress pattern from Blaverry. The fun thing about this pattern is it gives you a lot of different design options. This week, Blaverry is offering a discount on this pattern so if you like cute, new patterns and want a discount, go to the end of this post for a code to save you some money.


I had my almost 11 month old granddaughter in mind for this cute dress. I made the 12 month size for her. She's in the 95 percentile for height, so the dress had to be long enough for her.  After consulting with my daughter we decided to make a dress with a straight hem and the elbow length sleeves with the cuff. I really appreciate that this pattern is packed full of a lot of design choices, so we could tailor it exactly how we wanted.  

My first choice was what fabric to use.  For Mother's Day, one of the gifts I received was three nautical fabrics and some laser cut anchor buttons.  If you sew, you'll agree with me that this was an extremely thoughtful gift!  I wanted to use these items to make something classic.  When I saw a request for volunteers to test a new pattern, I hoped that one of these fabrics would look fabulous with it.  I ended up using two of these fabrics, the ship chambray fabric accented with the rope fabric.


The dress sewed up easily, but there were a few details of the sewing process I'm going to show below because I like things spelled out a little more in the instructions.

First the tab detail: I wanted it to look more finished.  To do this, I only sewed one seam to the bodice and then tucked under the bottom seam and sewed it by hand.


With the cuff, I turned one seam under 3/8 of an inch and ironed it. Then I sewed the edge not turned up to the sleeve.


The final step was to hand sew the ironed cuff edge to the seam.  This way your cuff looks finished if you choose to fold the cuff up.


At this point, I had a few choices to make and believe me, this pattern is full of tons of choices. 

Choice one:  cuffs up or down.
Choice two:  cuffs with buttons or without buttons.   


Choice three:  large button ( see photo above) or smaller button (see photo below).


To solve this dilemma, I took the above two photos and sent them to my daughter to let her decide. After all, this dress was designed for her little girl and I wanted my daughter to like it. Here's my adorable granddaughter modeling her new dress: 


Her mom stated that the only way to keep her still in one place was to let her pull out her books. She's a girl after my heart.  

Here's what my daughter chose: cuffs up, one small button, basic straight hem, no collar, 3/4 length sleeves and bias tape to finish off the dress.  It's little long but she's got one more month until she's supposed to be a 12 mo. size.  Oh well, this dress will just fit her a little longer than most of her clothes. Another great thing about this dress is that it can even be worn as a tunic once it gets too short to wear as a dress, because it is so roomy.  


If you'd like to purchase this fun pattern go to BLAVERY.  Use the following coupon code "ILOVEBLAVERY10" at checkout for a 10% off during this blog tour.  


To see the other versions of this pattern, check out the following blogs:

November 3rd

November 4th

November 5th

November 6th

November 7th
Let me know what you think about this cute pattern!
Side note, I just opened an Etsy shop, please come by and take a look.
xoxo Grandma

Monday, October 27, 2014

Tickle Monster - a GIVEAWAY, Costume Tutorial & Free Pattern


My Halloween costume-making frenzy continues!  Check out this post and this one to see other costumes I've made this year. 

This next costume has a GIVEAWAY included, so read on my friends for a wonderful surprise that could be yours! 

This particular costume is for my rambunctious two-year-old grandson. My daughter suggested that I make him a monster costume for Halloween.  Knowing how two-year-olds can act, I decided he needed to be some type of kind or silly monster, so he wouldn't torment his baby sister. Then the idea hit me, why not make a Tickle Monster costume? Have you ever heard of the Tickle Monster? I hadn't either until my daughter received this book and Tickle Monster gloves as a baby gift: 


It's a colorful, whimsically illustrated book about a monster that tickles. The boxed set comes with Tickle Monster gloves too, so you can tickle your little one while you read to them. Isn't that the cutest idea for a kid's book?  I love it. The set makes for a fun interactive read.  It can be purchased from the publisher, COMPENDIUM INC. The exciting news is, you'll have a chance to WIN this gift set... so keep reading to find out how!

Firstly, here's a photo of the Tickle Monster, so you can see what I used as a guide to make the costume.

Next, was the fabric selection; I found a colorful stripped shirt which I used for the horns and tail. I used some scrap white and black fabric for his eyes, turquoise fabric for his ears and then purchased soft blue fleece, orange fabric and red fluffy yarn. I drew the pattern for his horns, ears and eyes HERE. (Free download, just make sure the "fit to page" is not checked...print full image.) 


From the shirt, I cut a squiggly shaped tail as wide and long as possible, making sure the stripes matched up.  Once that tail was cut, I then cut out the horns.  The nose was an oval, 6 1/4 inches x 8 1/2 inches. The hood pattern came from the crab version of Butterick #5597 pattern: 


Here is a step by step tutorial of that process:

  1. Cut out all the pattern pieces.
  2. Cut out the nose.
  3. Sew the following together, once sewn, turn right side out: 
  •  the black pupil onto the eyes. 
  •  add the batting to the ears and stitch together.  
  •  sew the horns together, clipping the top so it'll have a pointy top. 
  •  sew the tail together, matching the stripes.  
    4.  Sew "ear" details using a sewing machine.


5.  Make a gathering stitch along the orange oval nose. Pull the stitches enough so that fiber fill or batting can be added to make the nose a nice round shape.
6.  Stuff the horns and the tail.
7.  Pin on extra wide white rick rack - 3 teeth per side.
8.  Here's how the back side of the rick rack looks before it's sewn to the hood.


9.    Decide where on the hood you want the eyes to be sewn.  Using pins, mark the spot.            Now, cut straight across the place you marked.
10.  From the right side, push the eyes through the opening you just cut, leaving the bottom of the fabric 1/2" past the hole. Sew the eyes in place.  ow stuff those eyes just a little.  Fold down the overhanging fabric and stitch closed. This step will hold the stuffing in place.
11.  Onto the lower middle of the hood, hand stitch the nose in place.
12.  Sew Velcro to the chin strap on both sides of the hood. 


For the yarn, I used Yarn Bee, Fleece Lite, color Stoplight #62, all of which I found at Hobby Lobby.  Then I made some light blue shorts.  Onto those shorts I attached this tail.  My grandson got shorts because he lives on a tropical island and I didn't want him to be too warm in his costume.  I was told he likes chasing his tail, around and around in a circle.

The jacket was an easy sew, I used a size 3 from this pattern:


The only thing I changed was to make the back one pattern piece instead of two.  My little Tickle Monster told me his jacket was soft like his blanket. 


If you have any questions, please let me know and I'll answer as soon as possible.  

I'm now done with my Halloween costume making for another year.  May all the sweet, little monsters in your life enjoy Halloween!    

Now, for the giveaway: to enter to win this Tickle Monster Kit (a $34.95 value), follow the rules below.  This kit has graciously been donated by COMPENDIUM INC..    If you don't win or want another kit for a gift, Compendium is having a sale starting November 1st for all their family and friends.  You can save 30% off your order by entering the code "thankyou30".  I was told that this is one of the few sales they have all year.

GIVEAWAY RULES:
  1. Follow this blog.
  2. Follow xoxo Grandma on Pinterest.
  3. Pin your favorite image from this post.
  4. Leave a comment & let me know who you want to read this book & tickle.  Include your e-mail so I can contact you if you're the winner. 
  5. U.S. Resident only, DPO & APO welcome to participate.

You have until October 31, 2014 to enter. The winner will be announced on November 3, 2014 at 8 a.m. Eastern Time.  Best of luck!  - xoxo Grandma

Update:  November 3rd, The winner of the Tickle Monster Gift Set was Natalie Gleaves.  Congratulations and thank you to all that entered and left such kind comments.


Linked to: Project Run & Play, Totally Tutorials 


Tuesday, October 21, 2014

How to Make an Olaf Snowman Costume


If you haven't checked out my post on Halloween costumes yet, check out this one. That'll give you a little bit of background on my love for making Halloween costumes. It'll also show you a cute costume I made for one of my granddaughters.   

The second Halloween costume I created was for my grandson. He requested a snowman costume. Not just any snowman, of course. It had to be one like Olaf from Disney's Frozen, which is a current obsession with him and his sister (and every other child worldwide, right?).  I had hoped he would request a costume I actually had a pattern for, unlike the Very Hungry Caterpillar Costume his sister requested.  Luckily, I did have a snowman pattern. But I was instructed specifically to make it like Olaf.  

Here's how I made my snowman costume look like Olaf:  
I started with the following supplies:
  • White fleece
  • 2 - 1 1/2" wiggle eyes  (if making for a doll use 1.1 inch)
  • Brown felt
  • 2 pipe cleaners
  • Black fabric for buttons
  • Orange felt for nose
Patterns used: 


  • Simplicity #9347 - hood pattern piece only...I'm guessing that any hood pattern would work.  
    • I used this pattern for the basic snowman portion of the costume.  To make this snowman look like Olaf, I added a large black dot (button) onto the top ball and two black dots onto the bottom ball of the snowman.  Since I needed a size 5, I made all the seams 1/4" instead of 5/8". 
    • To the hood I added a semi circle piece that was about 9" wide by 10" high. I sewed the curved portion together, leaving the straight edge unsewn.  I stuffed that piece with batting and hand sewed it onto the top of the hood.  This because the top of Olaf's head.
    • I made a half circle from fleece which looked like a visor pattern to sew onto the hood.
    • I made a rectangular tooth from a scrap of shinny fabric.  I added some thick interfacing into the layers along with a little bit of batting so that the tooth had dimension.  This tooth was sewn into the middle of the visor.
    • I next used the carrot pattern from HERE, enlarged it so that the carrot pattern was as large as possible from a 9" x 12" piece of orange felt.
    • The carrot, nose, was sewn onto the head, resting on the visor piece.
    • I cut our felt circles that were slightly larger than the wobbly eyes and sewed the felt onto the head right above the visor and close to the nose.
    • I hot glued the wobbly eyes onto the black circles.
    • I made brown eyebrows from felt and stitched those above the eyes.

    Before I shipped this costume to my grandson, I had a friend's grandchild try this costume on for me, hoping he'd know this was supposed to be Olaf. He recognized this popular snowman, so that's a good thing.  


     When I showed my grandson the costumes progress while Face Timing, he exclaimed, "Grandma, it looks just like him!"  I have made a 5 year old happy, my work is done!  


    Under the snowman costume he is wearing his new dinosaur shirt.  I made him a brown, long sleeve tee shirt with a mostly white body. That way, after Halloween, he could still wear it. To see how this shirt was made, go HERE.  Happy Halloween!                               
    xoxo Grandma

    Shared: Project Run and Play, Nap Time Creations